Exploring GraphQL(.js)

When Facebook released GraphQL in 2015 they released two separate things; a specification and a working implementation of the specification in JavaScript called GraphQL.js.

GraphQL.js acts as a “reference implementation” for people implementing GraphQL in other languages but it’s also a polished production-worthy JavaScript library at the heart of the JavaScript GraphQL ecosystem.

GraphQL.js gives us, among other things, the graphql function, which is what does the work of turning a query into a response.

graphql(schema, `{ hello }`)
{
  "data": {
    "hello": "world"
  }
}

The graphql function above is taking two arguments, one is the { hello } query, the other, the schema could use a little explanation.

The Schema

In GraphQL you define types for all the things you want to make available.
GraphQL.org has a simple example schema written in Schema Definition Language.

type Book {
  title: String
  author: Author
  price: Float
}

type Author {
  name: String
  books: [Book]
}

type Query {
  books: [Book]
  authors: [Author]
}

There are a few types we defined (Book, Author, Query) and some that GraphQL already knew about (String, Float). All of those types are collectively referred to as our schema.

You can define your schema with Schema Definition Language (SDL) as above or, as we will do, use plain JavaScript. It’s up to you. For our little adventure today I’ll use JavaScript and define a single field called “hello” on the mandatory root Query type.

var { GraphQLObjectType, GraphQLString, GraphQLSchema } = require('graphql')
var query = new GraphQLObjectType({
  name: 'Query',
  fields: {
    hello: {type: GraphQLString, resolve: () => 'world'}
  }
})
var schema = new GraphQLSchema({ query })

The queries we receive are written in the GraphQL language, which will be checked against the types and fields we defined in our schema. In the schema above we’ve defined a single field on the Query type, and mapped a function that returns the string ‘world’ to that field.

GraphQL is a language like JavaScript or Python but the inner workings of other languages aren’t usually as visible or approachable as GraphQL.js make them. Looking at how GraphQL works can tell us a lot about how to use it well.

The life of a GraphQL query

Going from a query like { hello } to a JSON response happens in four phases:

  • Lexing
  • Parsing
  • Validation
  • Execution

Let’s take that little { hello } query and see what running it through that function looks like.

Lexing: turning strings into tokens

The query { hello } is a string of characters that presumably make up a valid query in the GraphQL language. The first step in the process is splitting that string into tokens. This work is done with a lexer.

var {createLexer, Source} = require('graphql/language')
var lexer = createLexer(new Source(`{ hello }`))

The lexer can tell us the current token, and we can advance the lexer to the next token by calling lexer.advance()

lexer.token
Tok {
  kind: '',
  start: 0,
  end: 0,
  line: 0,
  column: 0,
  value: undefined,
  prev: null,
  next: null }

lexer.advance()
Tok {
  kind: '{',
  start: 0,
  end: 1,
  line: 1,
  column: 1,
  value: undefined,
  next: null }

lexer.advance()
Tok {
  kind: 'Name',
  start: 1,
  end: 6,
  line: 1,
  column: 2,
  value: 'hello',
  next: null }

lexer.advance()
Tok {
  kind: '}',
  start: 6,
  end: 7,
  line: 1,
  column: 7,
  value: undefined,
  next: null }

lexer.advance()
Tok {
  kind: '',
  start: 7,
  end: 7,
  line: 1,
  column: 8,
  value: undefined,
  next: null }

It’s important to note that we are advancing by token not by character. Characters like commas, spaces, and new lines are all allowed in GraphQL since they make code nice to read, but the lexer will skip right past them in search of the next meaningful token.
These two queries will produce the same tokens you see above.

createLexer(new Source(`{ hello }`))
createLexer(new Source(`    ,,,\r\n{,\n,,hello,\n,},,\t,\r`))

The lexer also represents the first pass of input validation that GraphQL provides. Invalid characters are rejected by the lexer.

createLexer(new Source("*&^%$")).advance()
Syntax Error: Cannot parse the unexpected character "*"

Parsing: turning tokens into nodes, and nodes into trees

Parsing is about using tokens to build higher level objects called nodes.
node
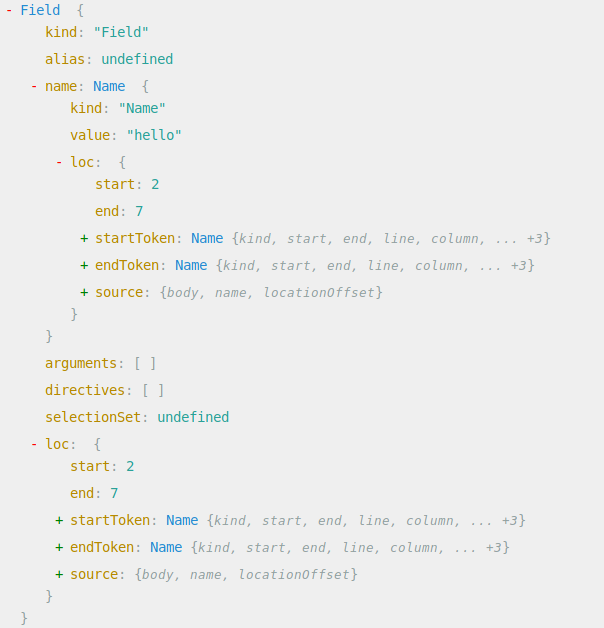
If you look you can see the tokens in there but nodes have more going on.

If you use a tool like grep or ripgrep to search through the source of GraphQL.js you will see where these nodes are coming from. There specialised parsing functions for each type of node, the majority of which are used internally by the parse function. These functions follow the pattern of accepting a lexer, and returning a node.

$ rg "function parse" src/language/parser.js
124:export function parse(
146:export function parseValue(
168:export function parseType(
183:function parseName(lexer: Lexer): NameNode {
197:function parseDocument(lexer: Lexer): DocumentNode {
212:function parseDefinition(lexer: Lexer): DefinitionNode {
246:function parseExecutableDefinition(lexer: Lexer): ExecutableDefinitionNode {
271:function parseOperationDefinition(lexer: Lexer): OperationDefinitionNode {
303:function parseOperationType(lexer: Lexer): OperationTypeNode

Using the parse function is a simple as passing it a GraphQL string. If we print the output of parse with some spacing we can see the what’s actually happening: it’s constructing a tree. Specifically, it’s an Abstract Syntax Tree (AST).

> var { parse } = require('graphql/language')
> console.log(JSON.stringify(parse("{hello}"), null, 2))
{
  "kind": "Document",
  "definitions": [
    {
      "kind": "OperationDefinition",
      "operation": "query",
      "variableDefinitions": [],
      "directives": [],
      "selectionSet": {
        "kind": "SelectionSet",
        "selections": [
          {
            "kind": "Field",
            "name": {
              "kind": "Name",
              "value": "hello",
              "loc": {
                "start": 1,
                "end": 6
              }
            },
            "arguments": [],
            "directives": [],
            "loc": {
              "start": 1,
              "end": 6
            }
          }
        ],
        "loc": {
          "start": 0,
          "end": 7
        }
      },
      "loc": {
        "start": 0,
        "end": 7
      }
    }
  ],
  "loc": {
    "start": 0,
    "end": 7
  }
}

If you play with this, or a more deeply nested query you can see a patten emerge. You’ll see SelectionSets containing selections containing SelectionSets. With a structure like this, a function that calls itself would be able to walk it’s way down the this entire object. We’re all set up for some recursive evaluation.

Validation: Walking the tree with visitors

The reason for an AST is to enable us to do some processing, which is exactly what happens in the validation step. Here we are looking to make some decisions about the tree and how well it lines up with our schema.

For any of that to happen, we need a way to walk the tree and examine the nodes. For that there is a pattern called the Vistor pattern, which GraphQL.js provides an implementation of.

To use it we require the visit function and make a visitor.

var { visit } = require('graphql')

var depth = 0
var vistor = {
  enter: node => {
    depth++
    console.log(' '.repeat(depth).concat(node.kind))
    return node
  },
  leave: node => {
    depth--
    return node
  },
}

Our vistor above has enter and leave functions attached to it. These names are significant since the visit function looks for them when it comes across a new node in the tree or moves on to the next node.
The visit function accepts an AST and a visitor and you can see our visitor at work printing out the kind of the nodes being encountered.

> visit(parse(`{ hello }`, visitor)
 Document
  OperationDefinition
   SelectionSet
    Field
     Name

With the visit function providing a generic ability to traverse the tree, the next step is to use this ability to determine if this query is acceptable to us.
This happens with the validate function. By default, it seems to know that kittens are not a part of our schema.

var { validate } = require('graphql')
validate(schema, parse(`{ kittens }`))
// GraphQLError: Cannot query field "kittens" on type "Query"

The reason it knows that is that there is a third argument to the validate function. Left undefined, it defaults to an array of rules exported from ‘graphql/validation’. These “specifiedRules” are responsible for all the validations that ensure our query is safe to run.

> var { validate } = require('graphql')
> var { specifiedRules } = require('graphql/validation')
> specifiedRules
[ [Function: ExecutableDefinitions],
  [Function: UniqueOperationNames],
  [Function: LoneAnonymousOperation],
  [Function: SingleFieldSubscriptions],
  [Function: KnownTypeNames],
  [Function: FragmentsOnCompositeTypes],
  [Function: VariablesAreInputTypes],
  [Function: ScalarLeafs],
  [Function: FieldsOnCorrectType],
  [Function: UniqueFragmentNames],
  [Function: KnownFragmentNames],
  [Function: NoUnusedFragments],
  [Function: PossibleFragmentSpreads],
  [Function: NoFragmentCycles],
  [Function: UniqueVariableNames],
  [Function: NoUndefinedVariables],
  [Function: NoUnusedVariables],
  [Function: KnownDirectives],
  [Function: UniqueDirectivesPerLocation],
  [Function: KnownArgumentNames],
  [Function: UniqueArgumentNames],
  [Function: ValuesOfCorrectType],
  [Function: ProvidedRequiredArguments],
  [Function: VariablesInAllowedPosition],
  [Function: OverlappingFieldsCanBeMerged],
  [Function: UniqueInputFieldNames] ]

validate(schema, parse(`{ kittens }`), specifiedRules)
// GraphQLError: Cannot query field "kittens" on type "Query"

In there you can see checks to ensure that the query only includes known types (KnownTypeNames) and things like variables having unique names (UniqueVariableNames).
This is the next level of input validation that GraphQL provides.

Rules are just visitors

If you dig into those rules (all in src/validation/rules/) you will realize that these are all just visitors.
In our first experiment with visitors, we just printed out the node kind. If we look at this again, we can see that even our tiny little query ends up with 5 levels of depth.

visit(parse(`{ hello }`, visitor)
 Document  // 1
  OperationDefinition // 2
   SelectionSet // 3
    Field // 4
     Name // 5

Let’s say for the sake of experimentation that 4 is all we will accept. To do that we’ll write ourselves a visitor, and then pass it into the third argument to validate.

var fourDeep = context => {
  var depth = 0, maxDepth = 4 // 😈
  return {
    enter: node => {
      depth++
      if (depth > maxDepth)
        context.reportError(new GraphQLError('💥', [node]))
      }
      return node
    },
    leave: node => { depth--; return node },
  }
}
validate(schema, parse(`{ hello }`), [fourDeep])
// GraphQLError: 💥

If you are building a GraphQL API server, you can take a rule like this and pass it as one of the options to express-graphql, so your rule will be applied to all queries the server handles.

Execution: run resolvers. catch errors.

This us to the execution step. There isn’t much exported from ‘graphql/execution’. What’s worthy of note is here is the root object, and the defaultFieldResolver. This work in concert to ensure that wherever there isn’t a resolver function, by default you get the value for that fieldname on the root object.

var { execute, defaultFieldResolver } = require('graphql/execution')
var args = {
  schema,
  document: parse(`{ hello }`),
  // value 0 in the "value of the previous resolver" chain
  rootValue: {},
  variableValues: {},
  operationName: '',
  fieldResolver: defaultFieldResolver,
}
execute(args)
{
  "data": {
    "hello": "world"
  }
}

Why all that matters

For me the take-away in all this is a deeper appreciation of what GraphQL being a language implies.

First, giving your users a language is empowering them to ask for what they need. This is actually written directly into the spec:

GraphQL is unapologetically driven by the requirements of views and the front‐end engineers that write them. GraphQL starts with their way of thinking and requirements and builds the language and runtime necessary to enable that.

Empowering your users is always a good idea but server resources are finite, so you’ll need to think about putting limits somewhere. The fact that language evaluation is recursive means the amount of recursion and work your server is doing is determined by the person who writes the query. Knowing the mechanism to set limits on that (validation rules!) is an important security consideration.

That caution comes alongside a big security win. Formal languages and type systems are the most powerful tools we have for input validation. Rigorous input validation is one of the most powerful things we can do to increase the security of our systems. Making good use of the type system means that your code should never be run on bad inputs.

It’s because GraphQL is a language that it let’s us both empower users and increase security, and that is a rare combination indeed.

Tagged template literals and the hack that will never go away

Tagged template literals were added to Javascript as part of ES 2015. While a fair bit has been written about them, I’m going to argue their significance is underappreciated and I’m hoping this post will help change that. In part, it’s significant because it strikes at the root of a problem people had otherwise resigned themselves to living with: SQL injection.

Just so we are clear, before ES 2015, combining query strings with untrusted user input to create a SQL injection was done via concatenation using the plus operator.

let query = 'select * from widgets where id = ' + id + ';'

As of ES 2015, you can create far more stylish SQL injections using backticks.

let query = `select * from widgets where id = ${id};`

By itself this addition is really only remarkable for not being included in the language sooner. The backticks are weird, but it gives us some much-needed multiline string support and a very Rubyish string interpolation syntax. It’s pairing this new syntax with another language feature known as tagged templates that has a real potential to make an impact on SQL injections.

> let id = 1
// define a function to use as a "tag"
> sql = (strings, ...vars) => ({strings, vars})
[Function: sql]
// pass our tag a template literal
> sql`select * from widgets where id = ${id};`
{ strings: [ 'select * from widgets where id = ', ';' ], vars: [ 1 ] }

What you see above is just a function call, but it no longer works like other languages. Instead of doing the variable interpolation first and then calling the sql function with select * from widgets where id = 1;, the sql function is called with an array of strings and the variables that are supposed to be interpolated.

You can see how different this is from the standard evaluation process by adding brackets to make this a standard function invocation. The string is interpolated before being passed to the sql function, entirely loosing the distinction between the variable (which we probably don’t trust) and the string (that we probably do). The result is an injected string and an empty array of variables.

> sql(`select * from widgets where id = ${id};`)
{ strings: 'select * from widgets where id = 1;', vars: [] }

This loss of context is the heart of matter when it comes to SQL injection (or injection attacks generally). The moment the strings and variables are combined you have a problem on your hands.

So why not just use parameterized queries or something similar? It’s generally held that good code expresses the programmers intent. I would argue that our SQL injection example code perfectly expresses the programmers intent; they want the id variable to be included in the query string. As a perfect expression of the programmers intent, this should be acknowledged as “good code”… as well as a horrendous security problem.

let query = sql(`select * from widgets where id = ${id};`)

When the clearest expression of a programmers intent is also a security problem what you have is a systemic issue which requires a systemic fix. This is why despite years of security education, developer shaming and “push left” pep-talks SQL injection stubbornly remains “the hack that will never go away”. It’s also why you find Mike Samuel from Google’s security team as the champion of the “Template Strings” proposal.

You can see the fruits of this labour by noticing library authors leveraging this to deliver a great developer experience while doing the right thing for security. Allan Plum, the driving force behind the Arangodb Javascript driver leveraging tagged template literals to let users query ArangoDB safely.

The aql (Arango Query Language) function lets you write what would in any other language be an intent revealing SQL injection, safely returns an object with a query and some accompanying bindvars.

aql`FOR thing IN collection FILTER thing.foo == ${foo} RETURN thing`
{ query: 'FOR thing IN collection FILTER thing.foo == @value0 RETURN thing',
  bindVars: { value0: 'bar' } }

Mike Samuel himself has a number of node libraries that leverage Tagged Template Literals, among them one to safely handle shell commands.

sh`echo -- ${a} "${b}" 'c: ${c}'`

It’s important to point out that Tagged Template Literals don’t entirely solve SQL injections, since there are no guarantees that any particular tag function will do “the right thing” security-wise, but the arguments the tag function receives set library authors up for success.

Authors using them get to offer an intuitive developer experience rather than the clunkiness of prepared statements, even though the tag function may well be using them under the hood. The best experience is from safest thing; It’s a great example of creating a “pit of success” for people to fall into.

// Good security hinges on devs learning to write
// stuff like this instead of stuff that makes sense.
// Clunky prepared statement is clunky.
const ps = new sql.PreparedStatement(/* [pool] */)
ps.input('param', sql.Int)
ps.prepare('select * from widgets where id = @id;', err => {
    // ... error checks
    ps.execute({id: 1}, (err, result) => {
        // ... error checks
        ps.unprepare(err => {
            // ... error checks
        })
    })
})

It’s an interesting thought that Javascripts deficiencies seem to have become it’s strength. First Ryan Dahl filled out the missing IO pieces to create Node JS and now missing features like multiline string support provide an opportunity for some of the worlds most brilliant minds to insert cutting edge security features along-side these much needed fixes.

I’m really happy to finally see language level fixes for things that are clearly language level problems, and excited to see where Mike Samuel’s mission to “make the easiest way to express an idea in code a secure way to express that idea” takes Javascript next. It’s the only way I can see to make “the hack that will never go away” go away.

GraphQL i18n

One of the things I love about GraphQL is that it is “self documenting”, but of course, here in Canada the obvious question that follows is “in both languages?”. Since GraphQL is one of the core technologies for me I really wanted to figure out a decent answer when people ask about i18n, but it’s never been clear to me how to handle it.

Since I’m familiar with GraphQL-js, I’ll be using that here but Apollo Server is on my list to explore and may have some different answers. I’ll also be using my favourite i18n library Lingui here, but any other i18n library could be easily substituted.

Just to be clear, the issue at hand is not i18n for the data (that you’d handle with something like ArangoDB’s TRANSLATE) it’s i18n for the description attributes that can be attached to all your schema objects.
Once description strings are added, anyone (and “anyone” could and probably will include developer tools, IDEs or developers themselves) can introspect on the schema by querying the __schema or __type fields to find the descriptions with a query like this:

{
  __schema {
    queryType {
      fields {
        name
        description
        args {
          name
          description
        }
      }
    }
  }
}

To help think this through lets create a basic schema that just returns the current time and returns the DateTime type from above and use it to explore i18n.

const DateTime = new GraphQLObjectType({
  name: 'DateTime',
  description: 'An example date/time object.',
  fields: () => ({
    date: {
      description: 'The current date in DD/MM/YYYY format.',
      type: GraphQLString,
    },
    time: {
      description: 'The current time in HH:MM:SS AM/PM format.',
      type: GraphQLString,
    },
  }),
})

const query = new GraphQLObjectType({
  name: 'Query',
  fields: {
    now: {
      description: 'Returns current time and date values.',
      type: DateTime, // what the resolve function will produce
      resolve: (root, args, context) => {
        let now = new Date()
        let time = now.toLocaleDateString(context.language, {
          timeZone: 'America/Toronto',
        })
        let date = now.toLocaleTimeString(context.language, {
          timeZone: 'America/Toronto',
        })
        return { date, time }
      },
    },
  },
})

With our query type and it’s return type created, we just need to wrap that in a schema and pass it to the express-graphql middleware. It will mount the schema on the url we specify and pass the request object to all our resolvers as the third argument (aka “the context”).

Adding the requestLanguage middleware from the express-request-language library before express-graphql means that incoming requests will be checked for the Accept-Language header, and the best matching language of the languages you specify will be attached to the request as request.language. Remember that express-graphql is passing the request to our resolvers as context so that means that we access the request.language as context.language.

const schema = new GraphQLSchema({ query })

let server = express()

server
  .use(
    requestLanguage({
      languages: ['en', 'fr'], // First locale becomes the default
    }),
  )
  .use('/graphql', graphqlHTTP({ schema }))

server.listen(3000)

With this basic setup, we can already see the outline of the issue: our schema and types with their accompanying descriptions are defined once when the script is run, but the language we want is whatever is appropriate for each request.

It probably won’t surprise you that our middleware can been passed a function that it will execute per request that will produce the configuation needed. With that in place we have a pretty clear path forward.

server
  .use(
    requestLanguage({
      languages: ['en', 'fr'], // First locale becomes the default
    }),
  )
  .use(
    '/graphql',
    graphqlHTTP((request, response, graphQLParams) => {
      return {
        schema: new GraphQLSchema({
          query: // define a schema and types using the request language and pass it in
        }),
      }
    }),
  )

My first step was to define a function that recieves an i18n object and returns a schema.

const createSchema = i18n => {
  // Define a type that describes the data
  const DateTime = new GraphQLObjectType({
    name: 'DateTime',
    description: i18n.t`An example date/time object.`,
    fields: () => ({
      date: {
        description: i18n.t`The current date in DD/MM/YYYY format.`,
        type: GraphQLString,
      },
      time: {
        description: i18n.t`The current time in HH:MM:SS AM/PM format.`,
        type: GraphQLString,
      },
    }),
  })

  const query = new GraphQLObjectType({
    name: 'Query',
    fields: {
      now: {
        description: i18n.t`Returns current time and date values.`,
        type: DateTime, // what the resolve function will produce
        resolve: (root, args, context) => {
          let now = new Date()
          let time = now.toLocaleDateString(context.language, {
            timeZone: 'America/Toronto',
          })
          let date = now.toLocaleTimeString(context.language, {
            timeZone: 'America/Toronto',
          })
          return { date, time }
        },
      },
    },
  })

  return query
}

With that defined I can use it to produce a schema, but because lingui works by scanning for and extracting things like i18n.t`...` from my code, I have to remember not to rename that otherwise lingui extract won’t find my translations. Additionally I don’t want variable shadowing, so I import i18n under a different name and rename it to what Lingui expects only when I go to create the schema:

const express = require('express')
const graphqlHTTP = require('express-graphql')
const { GraphQLSchema, GraphQLObjectType, GraphQLString } = require('graphql')
const { i18n: internationalization, unpackCatalog } = require('lingui-i18n') // import i18n as something else
const requestLanguage = require('express-request-language')

internationalization.load({  // Load our language files
  fr: unpackCatalog(require('./locale/fr/messages.js')),
  en: unpackCatalog(require('./locale/en/messages.js')),
})

// Our function that creates the schema
const createSchema = i18n => {
...
}

let server = express()

server
  .use(
    requestLanguage({
      languages: internationalization.availableLanguages.sort(), // First locale becomes the default
    }),
  )
  .use(
    '/graphql',
    graphqlHTTP(async (request, response, graphQLParams) => {
      internationalization.activate(request.language)
      return {
        schema: new GraphQLSchema({
          query: createSchema(internationalization),
        }),
      }
    }),
  )

server.listen(3000)

Getting Lingui properly integrated took a little fiddling. It brings along it’s own copy of babel which doesn’t seem to see your other babel plugins but does read your .babelrc.
Configuring my projects babel using only command line options, solved the clashes with lingui’s babel, and then making sure Lingui would only look for translations in the src folder was all I needed to get Lingui in working along-side the usual “transpile to dist” workflow (the finished code is available here).
After running Lingui’s lingui extract and doing my translations I’m now able to hit my endpoint and see the translated descriptions:

# Ask for English!
mike@sleepycat:~$ curl -H "Accept-Language: en" -H "Content-Type: application/graphql" -d "{ __schema {queryType { fields { name description } } } }" "localhost:3000/graphql"
{"data":{"__schema":{"queryType":{"fields":[{"name":"now","description":"Returns current time and date values."}]}}}}
# Ask for French!
mike@sleepycat:~$ curl -H "Accept-Language: fr" -H "Content-Type: application/graphql" -d "{ __schema {queryType { fields { name description } } } }" "localhost:3000/graphql"
{"data":{"__schema":{"queryType":{"fields":[{"name":"now","description":"Renvoie les valeurs actuelles de date et d'heure."}]}}}}

Performance

Obviously defining the schema and types before processing each request is going to cost something but it would be good to know what. This is a question some load testing with wrk2 can give us insight into (with the caveat that both the server and the load testing program were running on the same laptop, so take this with a large grain of salt).

First, a version without the schema per request:

mike@sleepycat:~$ wrk2 -t4 -c100 -d30s -R2000 --latency "http://localhost:3000/graphql?query=%7B%0A%20%20now%20%7B%0A%20%20%20%20date%0A%20%20%20%20time%0A%20%20%7D%0A%7D"
Running 30s test @ http://localhost:3000/graphql?query=%7B%0A%20%20now%20%7B%0A%20%20%20%20date%0A%20%20%20%20time%0A%20%20%7D%0A%7D
  4 threads and 100 connections
  Thread calibration: mean lat.: 3309.908ms, rate sampling interval: 11272ms
  Thread calibration: mean lat.: 3310.066ms, rate sampling interval: 11280ms
  Thread calibration: mean lat.: 3308.845ms, rate sampling interval: 11280ms
  Thread calibration: mean lat.: 3310.191ms, rate sampling interval: 11280ms
  Thread Stats   Avg      Stdev     Max   +/- Stdev
    Latency    11.83s     3.26s   17.47s    57.94%
    Req/Sec   214.00      0.00   214.00    100.00%

And now the one with our i18n schema per request:

mike@sleepycat:~$ wrk2 -t4 -c100 -d30s -R2000 --latency "http://localhost:3000/graphql?query=%7B%0A%20%20now%20%7B%0A%20%20%20%20date%0A%20%20%20%20time%0A%20%20%7D%0A%7D"
Running 30s test @ http://localhost:3000/graphql?query=%7B%0A%20%20now%20%7B%0A%20%20%20%20date%0A%20%20%20%20time%0A%20%20%7D%0A%7D
  4 threads and 100 connections
  Thread calibration: mean lat.: 3196.913ms, rate sampling interval: 11296ms
  Thread calibration: mean lat.: 3196.537ms, rate sampling interval: 11288ms
  Thread calibration: mean lat.: 3115.362ms, rate sampling interval: 10493ms
  Thread calibration: mean lat.: 3196.062ms, rate sampling interval: 11288ms
  Thread Stats   Avg      Stdev     Max   +/- Stdev
    Latency    11.91s     3.35s   17.81s    57.65%
    Req/Sec   207.00      0.00   207.00    100.00%

So generating our schema/types per request drops us from 214 requests per second down to 207. Clearly it’s not free, but in this little example it’s pretty reasonable and in this world of microservices, there are a fair number of services that aren’t much bigger than this example. That said, a ~3% drop for something so simple is probably something you would want to watch carefully. A larger schema with more imports might well be far more costly. Clearly this little performance test is far from rigorous, but it’s nice to have some vague sense of the impact.

i18n and GraphQL

In the end this blog post is as much a question as it is an answer. I’m pretty certain their are futher refinements to be made here and that there are ways to avoid some or maybe all of the performance penalty highlighted above.
I’m also pretty curious about what it would look like to get a similar thing happening with Apollo Server.
Hopefully this will help other people who are trying to do i18n with GraphQL and maybe surface better options.

Javascript i18n with Lingui

Living in a country with two official lanaguage means that you don’t get far into a project before the question of internationalization (aka i18n to anyone who has to type it more than a few times) comes up.

There are a few options for dealing with this in Javascript, but it’s taken a while to find one I like. First, I expect to use the same library on the server and on the client, and I expect to be able to use it with libraries like React.

React-Intl works OK on the client side, but using the underlying Intl on the server looks under-documented and deeply clunky. I18next is reasonable on the server and has integrations with most client side frameworks. While it’s a decent choice, there is something about the way it works which rubs me the wrong way.

i18next.init({
  lng: 'en',
  fallbackLng: 'en',
  resources: {
    en: {
      translation: {
        person: {
          firstName: "First name",
          lastName: "Last name",
	}
      },
    },
    fr: {
      translation: {
        person: {
          firstName: "Prénom",
          lastName: "Nom de famille",
	}
      },
    },
  }
})

The above code shows how to use it. It’s a pretty standard setup (very familiar if you’ve ever done i18n in Rails), some singleton object (you can make others if you need to) with an internal collection of messages which are stored as a JSON object.

One of the things that I dislike about this approach is that the translations stored in that JSON object tend to accumulate and hang around long after the code that needs that message is gone.

The other thing I find doesn’t sit well with me is the way you access those messages: i18n.t('mutation.fields.purchase.args.expiryYear').

What you are looking at is a function call that assumes the existence of an object like {translation:{fields:{purchase:{args:{expiryYear: "Expiry year"}}}}}. This an example of structural coupling, my code depends on the structure of that object. This sort of thing is normally considered an anti-pattern, a violation of the “law of Demeter”, but it’s pretty common among i18n libraries. I have to decide on the structure to start with, and after that, changing that structure (say if you decide you didn’t make the right decision about how to structure it originally) is going to break a lot of things.

Poking around I stumbled on a library that takes a different approach: Lingui.

Lingui is interesting because it builds a nice translation workflow by leveraging the now ubiquitous infrastructure of Babel.

Aside from the core code in lingui-i18n (and other packages dealing with React) the heart of lingui’s approach are two babel plugins: babel-plugin-lingui-extract-messages and babel-plugin-lingui-transform-js.

We can install what we need for the server side like this.

yarn add lingui-cli lingui-i18n

The babel-plugin-lingui-extract-messages plugin does what is advertised on the tin. First we need a little test code to extract.

const { i18n } = require('lingui-i18n')

i18n.t`I do like a bit of gorgonzola.`
i18n.t`Not even Wensleydale?`

Then we need to create some locales using the helper supplied by lingui-cli:

[mike@longshot lingui]$ lingui add-locale en fr
Added locale en.
Added locale fr.

(use "lingui extract" to extract messages)
[mike@longshot lingui]$ tree
.
├── index.js
├── locale
│   ├── en
│   │   └── messages.json
│   └── fr
│       └── messages.json
├── package.json
└── yarn.lock

Next we use babel-plugin-lingui-extract-messages via the Lingui CLI commandlingui extract to scan our code for those internationalized strings and extract them into translation files.

[mike@longshot lingui]$ lingui extract
Extracting messages from source files…
Collecting all messages…
Writing message catalogues…
Messages extracted!

Catalog statistics:
┌──────────┬─────────────┬─────────┐
│ Language │ Total count │ Missing │
├──────────┼─────────────┼─────────┤
│ en       │      2      │    2    │
│ fr       │      2      │    2    │
└──────────┴─────────────┴─────────┘

(use "lingui add-locale <language>" to add more locales)
(use "lingui extract" to update catalogs with new messages)
(use "lingui compile" to compile catalogs for production)

Lingui prints out a nice summary of the state of my translations.
A look at the translation files shows how Lingui can solve that coupling problem; it generates an object with the content of the strings used as the keys. This way my translations are looked up by content, rather than via their location in some stucture. Since Lingui defaults to showing the message id (which is actually the English content string from the source) we’ll just edit the French messages file.

[mike@longshot lingui]$ cat locale/fr/messages.json 
{
  "I do like a bit of gorgonzola.": {
    "translation": "Je aime un peu de gorgonzola.",
    "origin": [
      [
        "index.js",
        3
      ]
    ]
  },
  "Not even Wensleydale?": {
    "translation": "Pas même Wensleydale?",
    "origin": [
      [
        "index.js",
        4
      ]
    ]
  }
}

With that done we need to compile the json into JS files for use with lingui compile. The missing piece now is the how those i18n.t tagged template literals are going to produce our translated strings at runtime, and the answer is babel-plugin-lingui-transform-js.

Since a picture is worth a thousand words, I think the best way to explain it is this:

[mike@longshot lingui]$ cat index.js | babel --plugins lingui-transform-js
const { i18n } = require('lingui-i18n');

i18n._('I do like a bit of gorgonzola.');
i18n._('Not even Wensleydale?');

As you can see, all the calls to i18n.t`` are replaced with calls to i18n._(). This is underscore function is the low level api that Lingui uses to actually give you the translated strings.

Now that we know that, let’s take a look at what using the library looks like.

[mike@longshot lingui]$ node
> var { i18n, unpackCatalog } = require('lingui-i18n')
undefined
> i18n.load({fr: unpackCatalog(require('./locale/fr/messages.js')), en: unpackCatalog(require('./locale/en/messages.js'))})
undefined
> i18n.availableLanguages
[ 'fr', 'en' ]>
> i18n.activate('en')
undefined
> i18n._('I do like a bit of gorgonzola.')
'I do like a bit of gorgonzola.'
> i18n.activate('fr')
undefined
> i18n._('I do like a bit of gorgonzola.')
'Je aime un peu de gorgonzola.'

Lingui has some more tricks up it’s sleeve like pluralization, but one of the things I’m happiest about is that this approach also solves that “unused messages” problem that I mentioned.

If we delete our “Not even Wensleydale?” message and run lingui extract again we can see the benefits of this static analysis style approach: Lingui knows when there is nothing referencing a message, and marks it as obsolete.

[mike@longshot lingui]$ cat locale/fr/messages.json 
{
  "I do like a bit of gorgonzola.": {
    "translation": "Je aime un peu de gorgonzola.",
    "origin": [
      [
        "index.js",
        3
      ]
    ]
  },
  "Not even Wensleydale?": {
    "translation": "Pas même Wensleydale?",
    "origin": [
      [
        "index.js",
        4
      ]
    ],
    "obsolete": true
  }
}

Better still, Lingui will clean out the obsolete messages for you with lingui extract --clean.

[mike@longshot lingui]$ lingui extract --clean
Extracting messages from source files…
Collecting all messages…
Writing message catalogues…
Messages extracted!

Catalog statistics:
┌──────────┬─────────────┬─────────┐
│ Language │ Total count │ Missing │
├──────────┼─────────────┼─────────┤
│ en       │      1      │    1    │
│ fr       │      1      │    0    │
└──────────┴─────────────┴─────────┘

(use "lingui add-locale <language>" to add more locales)
(use "lingui extract" to update catalogs with new messages)
(use "lingui compile" to compile catalogs for production)
[mike@longshot lingui]$ cat locale/fr/messages.json 
{
  "I do like a bit of gorgonzola.": {
    "translation": "Je aime un peu de gorgonzola.",
    "origin": [
      [
        "index.js",
        3
      ]
    ]
  }
}

For me this is pretty much the holy grail for i18n. Here I’ve focused on using Lingui without any other libraries, but it’s just as awesome with React. With locale files that can be plausibly handed over to a translator, and tooling that both find and remove translations Lingui has become my goto i18n library.

ArangoDB and GraphQL

For a while now I’ve been wondering about what might be the minimal set of technologies that allows me to tackle the widest range of projects. The answer I’ve arrived at, for backend development at least, is GraphQL and ArangoDB.

Both of these tools expand my reach as a developer. Projects involving integrations, multiple clients and complicated data that would have been extremely difficult are now within easy reach.

But the minimal set idea is that I can enjoy this expanded range while juggling far fewer technologies than before. Tools that apply in more situations mean fewer things to learn, fewer moving parts and more depth in the learning I do.

While GraphQL and ArangoDB are both interesting technologies individually, it’s in using them together that I’ve been able to realize those benefits; one of those moments where the whole is different from the sum of it’s parts.

Backend Minimalism

My embrace of Javascript has definitely been part of creating that minimal set. A single language for both front and back end development has been a big part of simplifying my tech stack. Both GraphQL and ArangoDB can be used in many languages, but Javascript support is what you might describe as “first among equals” for both projects.

GraphQL can replace, and for me has replaced, server side frameworks like Rails or Django, leaving me with a handful of Javascript functions and more modular, testable code.

GraphQL also replaces ReST, freeing me from thinking about HATEOAS, bike-shedding over the vagaries of ReST, or needing pages and pages of JSON API documentation to save me from bike-shedding over the vagaries of ReST.

ArangoDB has also reduced the number of things I need to need to know. For a start it has removed the “need” for an ORM (no relational database, no need for Object Relational Mapping), which never really delivered on it’s promise to free you from knowing the underlying SQL.

More importantly it’s replaced not just NoSQL databases with a razor-thin set of capabilities like Mongodb (which stores nested documents but can’t do joins) or Neo4j (which does joins but can’t store nested documents), but also general purpose databases like MySQL or Postgres. I have one query language to learn, and one database whose quirks and characteristics I need to know.

It’s also replaced the deeply unpleasant process of relational data modeling with a seamless blend of documents and graphs that make modeling even really ugly connected datasets anticlimactic. As a bonus, in moving the schema outside the database GraphQL lets us enjoy all the benefits of a schema (making sure there is at least some structure I can rely on) and all the benefits of schemalessness (flexibility, ease of change).

Tools that actually reduce the number of things you need to know don’t come along very often. My goal here is to give a sense of what it looks like to use these two technologies together, and hopefully admiring the trees can let us appreciate the forest.

Show me the code

First we need some data to work with. ArangoDB’s administrative interface has some example graphs it can create, so lets use one to explore.

example_graphs

If we select the “knows” graph, we get a simple graph with 5 vertices.

knows_graph

This graph is going to be the foundation for our little exploration.

Next, the only really meaningful information these vertices have is a name attribute. If we are wanting to create a GraphQL type that represents one of these objects it would look like this:

  let Person = new GraphQLObjectType({
    name: 'Person',
    fields: () => ({
      name: {
        type: GraphQLString
      }
    })
  })

Now that we have a type that describes what a Person object looks like we can use it in a schema. This schema has a field called person which has two attributes: type, and resolve.

let schema = new GraphQLSchema({
    query: new GraphQLObjectType({
      name: 'Query',
      fields: () => ({
        person: {
          type: Person,
          resolve: () => {
            return {name: 'Mike'}
          },
        }
      })
    })
  })

The resolve is a function that will be run whenever graphql is asked to produce a person object. type is a type that describes the object that the resolve function returns, which in this this case is our Person type.

To see if this all works we can write a test using Jest.

import {
  graphql,
  GraphQLSchema,
  GraphQLObjectType,
  GraphQLString,
  GraphQLList,
  GraphQLNonNull
} from 'graphql'

describe('returning a hardcoded object that matches a type', () => {

  let Person = new GraphQLObjectType({
    name: 'Person',
    fields: () => ({
      name: {
        type: GraphQLString
      }
    })
  })

  let schema = new GraphQLSchema({
    query: new GraphQLObjectType({
      name: 'Query',
      fields: () => ({
        person: {
          type: Person,
          resolve: () => {
            return {name: 'Mike'}
          },
        }
      })
    })
  })

  it('lets you ask for a person', async () => {

    let query = `
      query {
        person {
          name
        }
      }
    `;

    let { data } = await graphql(schema, query)
    expect(data.person).toEqual({name: 'Mike'})
  })

})

This test passes which tells us that we got everything wired together properly, and the foundation laid to talk to ArangoDB.

First we’ll use arangojs and create a db instance and then a function that allows us to get a person using their name.

//src/database.js
import arangojs, { aql } from 'arangojs'

export const db = arangojs({
  url: `http://${process.env.ARANGODB_USER}:${process.env.ARANGODB_PASSWORD}@127.0.0.1:8529`,
  databaseName: 'knows'
})

export async function getPersonByName (name) {
  let query = aql`
      FOR person IN persons
        FILTER person.name == ${ name }
          LIMIT 1
          RETURN person
    `
  let results = await db.query(query)
  return results.next()
}

Now lets use that function with our schema to retrieve real data from ArangoDB.

import {
  graphql,
  GraphQLSchema,
  GraphQLObjectType,
  GraphQLString,
  GraphQLList,
  GraphQLNonNull
} from 'graphql'
import {
  db,
  getPersonByName
} from '../src/database'

describe('queries', () => {

  it('lets you ask for a person from the database', async () => {

    let Person = new GraphQLObjectType({
      name: 'Person',
      fields: () => ({
        name: {
          type: GraphQLString
        }
      })
    })

    let schema = new GraphQLSchema({
      query: new GraphQLObjectType({
        name: 'Query',
        fields: () => ({
          person: {
            args: { //person now accepts args
              name: { // the arg is called "name"
                type: new GraphQLNonNull(GraphQLString) // name is a string & manadatory
              }
            },
            type: Person,
            resolve: (root, args) => {
              return getPersonByName(args.name)
            },
          }
        })
      })
    })

    let query = `
        query {
          person(name "Eve") {
            name
          }
        }
      `

    let { data } = await graphql(schema, query)
    expect(data.person).toEqual({name: 'Eve'})
  })
})

Here we have modified our schema to accept a name argument when asking for a person. We access the name via the args object and pass it to our database function to go get the matching person from Arango.

Let’s add a new database function to get the friends of a user given their id.
What’s worth pointing out here is that we are using ArangoDB’s AQL traversal syntax. It allows us to do a graph traversal across outbound edges get the vertex on the other end of the edge.

export async function getFriends (id) {
  let query = aql`
      FOR vertex IN OUTBOUND ${id} knows
        RETURN vertex
    `
  let results = await db.query(query)
  return results.all()
}

Now that we have that function, instead of adding it to the schema, we add a field to the Person type. In the resolve for our new friends field we are going to use the root argument to get the id of the current person object and then use our getFriends function to do the traveral to retrieve the persons friends.

    let Person = new GraphQLObjectType({
      name: 'Person',
      fields: () => ({
        name: {
          type: GraphQLString
        },
        friends: {
          type: new GraphQLList(Person),
          resolve(root) {
            return getFriends(root._id)
          }
        }
      })
    })

What’s interesting is that because of GraphQL’s recursive nature, this change lets us query for friends:

        query {
          person(name: "Eve") {
            name
            friends {
              name
            }
          }
        }

and also ask for friends of friends (and so on) like this:

        query {
          person(name: "Eve") {
            name
            friends {
              name
              friends {
                name
              }
            }
          }
        }

We can show that with a test.

import {
  graphql,
  GraphQLSchema,
  GraphQLObjectType,
  GraphQLString,
  GraphQLList,
  GraphQLNonNull
} from 'graphql'
import {
  db,
  getPersonByName,
  getFriends
} from '../src/database'

describe('queries', () => {

  it('returns friends of friends', async () => {

    let Person = new GraphQLObjectType({
      name: 'Person',
      fields: () => ({
        name: {
          type: GraphQLString
        },
        friends: {
          type: new GraphQLList(Person),
          resolve(root) {
            return getFriends(root._id)
          }
        }
      })
    })

    let schema = new GraphQLSchema({
      query: new GraphQLObjectType({
        name: 'Query',
        fields: () => ({
          person: {
            args: {
              name: {
                type: new GraphQLNonNull(GraphQLString)
              }
            },
            type: Person,
            resolve: (root, args) => {
              return getPersonByName(args.name)
            },
          }
        })
      })
    })

    let query = `
        query {
          person(name: "Eve") {
            name
            friends {
              name
              friends {
                name
              }
            }
          }
        }
      `

    let result = await graphql(schema, query)
    let { friends } = result.data.person
    let foaf = [].concat(...friends.map(friend => friend.friends))
    expect([{name: 'Charlie'},{name: 'Dave'},{name: 'Bob'}]).toEqual(expect.arrayContaining(foaf))
  })

})

This test has running a query three levels deep and walking the entire graph. Because we can ask for any combination of any of the things our types defined, we have a whole lot of flexibility with very little code. The code that’s there is just a few simple functions, modular and easy to test.

But what did we trade away to get all that? If we look at the queries that get sent to Arango with tcpdump we can see how that sausage was made.

// getPersonByName('Eve') from the person resolver in our schema 
{"query":"FOR person IN persons
  FILTER person.name == @value0
  LIMIT 1 RETURN person","bindVars":{"value0":"Eve"}}
// getFriends('persons/eve') in Person type -> returns Bob & Alice.
{"query":"FOR vertex IN OUTBOUND @value0 knows
  RETURN vertex","bindVars":{"value0":"persons/eve"}}
// now a new request for each friend:
// getFriends('persons/bob')
{"query":"FOR vertex IN OUTBOUND @value0 knows
  RETURN vertex","bindVars":{"value0":"persons/bob"}}
// getFriends('persons/alice')
{"query":"FOR vertex IN OUTBOUND @value0 knows
  RETURN vertex","bindVars":{"value0":"persons/alice"}}

What we have here is our own version of the famous N+1 problem. If we were to add more people to this graph things would get out of hand quickly.

Facebook, which has been using GraphQL in production for years, is probably even less excited about the prospect of N+1 queries battering their database than we are. So what are they doing to solve this?

Using Dataloader

Dataloader is a small library released by Facebook that solves the N+1 problem by cleverly leveraging the way promises work. To use it, we need to give it a batch loading function and then replace our calls to the database with calls call Dataloader’s load method in all our resolves.

What, you might ask, is a batch loading function? The dataloader documentation offers that “A batch loading function accepts an Array of keys, and returns a Promise which resolves to an Array of values.”

We can write one of those.

async function getFriendsByIDs (ids) {
  let query = aql`
    FOR id IN ${ ids }
      let friends = (
        FOR vertex IN OUTBOUND id knows
          RETURN vertex
      )
      RETURN friends
  `
  let response = await db.query(query)
  return response.all()
}

We can then use that in a new test.

import {
  graphql
} from 'graphql'
import DataLoader from 'dataloader'
import {
  db,
  getFriendsByIDs
} from '../src/database'
import schema from '../src/schema'

describe('Using dataloader', () => {

  it('returns friends of friends', async () => {

    let Person = new GraphQLObjectType({
      name: 'Person',
      fields: () => ({
        name: {
          type: GraphQLString
        },
        friends: {
          type: new GraphQLList(Person),
          resolve(root, args, context) {
            return context.FriendsLoader.load(root._id)
          }
        }
      })
    })

    let query = `
        query {
          person(name: "Eve") {
            name
            friends {
              name
              friends {
                name
              }
            }
          }
        }
      `
    const FriendsLoader = new DataLoader(getFriendsByIDs)
    let result = await graphql(schema, query, {}, { FriendsLoader })
    let { person } = result.data
    expect(person.name).toEqual('Eve')
    expect(person.friends.length).toEqual(2)
    let names = person.friends.map(friend => friend.name)
    expect(names).toContain('Alice', 'Bob')
  })

})

The key section of the above test is this:

    const FriendsLoader = new DataLoader(getFriendsByIDs)
    //                         schema, query, root, context
    let result = await graphql(schema, query, {}, { FriendsLoader })

The context object is passed as the fourth parameter to the graphql function which is then available as the third parameter in every resolve function. With our FriendsLoader attached to the context object, you can see us accessing it in the resolve function on the Person type.

Let’s see what effect that batch loading has on our queries.

// getPersonByName('Eve') from the person resolver in our schema 
{"query":"FOR person IN persons
  FILTER person.name == @value0
  LIMIT 1 RETURN person","bindVars":{"value0":"Eve"}}
// getFriendsByIDs(["persons/eve"]) -> returns Bob & Alice.
{"query":"FOR id IN @value0
   let friends = (
    FOR vertex IN  OUTBOUND id knows
      RETURN vertex
    )
  RETURN friends","bindVars":{"value0":["persons/eve"]}}
// getFriendsByIDs(["persons/alice","persons/bob"])
{"query":"FOR id IN @value0
   let friends = (
    FOR vertex IN  OUTBOUND id knows
      RETURN vertex
    )
  RETURN friends","bindVars":{"value0":["persons/alice","persons/bob"]}}

Now for a three level query (Eve, her friends, their friends) we are down to just 1 query per level and the N+1 problem is no longer a problem.

When it’s time to serve your data to the world, express-graphql supplies a middleware that we can pass our schema and loaders to like this:

import express from 'express'
import graphqlHTTP from 'express-graphql'
import schema from './schema'
import DataLoader from 'dataloader'
import { getFriendsByIDs } from '../src/database'

const FriendsLoader = new DataLoader(getFriendsByIDs)
const app = express()
app.use('/graphql', graphqlHTTP({ schema, context: { FriendsLoader }}))
app.listen(3000)
// http://localhost:3000/graphql is up and running!

What we just did

With just those few code examples we’ve built a backend system that provides a query-able API for clients backed by a graph database. Growing it would look like adding a few more functions and a few more types. The code stays modular and testable. Dataloader has ensured that we didn’t even pay a performance penalty for that.

A perfect combination

While geeking out on the technology is fun, it loses sight of what I think is the larger point: The design of both GraphQL and ArangoDB allow you to combine and recombine some really simple primitives to tackle anything you can think of.

With ArangoDB, it’s all just documents, whether you use them like that or treat them as key/value or a graph is up to you. While this approach is marketed as “multi-model” database, the term is unfortunate since it makes the database sound like it’s trying to do lots of things instead of leveraging some fundamental similarity between these types of data. That similarity becomes the “primitive” that makes all this flexibility possible.

For GraphQL, my application is just a bunch of functions in an Abstract Syntax Tree which get combined and recombined by client queries. The parser and execution engine take care of what gets called when.

In each case what I need to understand is simple, the behaviour I can produce is complex.

I’m still honing my minimal set for front end development, but for backend development this is now how I build. These days I’m refocusing my learning to go narrow and deep and it feels good. Infinite width never felt sustainable. It’s not apparent at first, but once that burden is lifted off your shoulders you will realize how heavy it was.

Working with the Google Vision API

I remember hearing a story about a developer whose contract with the military specified the number of kilos of documentation that were required to accompany the system they were building. I think of that story from time to time when I use Google products.

Google’s Vision API gives access to legit state-of-the-art Artificial Intelligence and is amazing for extracting text from images, but a concise modern example doesn’t seem to exist in spite of the huge volume of documentation.

The example they give is in the classic callback style:

var vision = require('@google-cloud/vision');

var visionClient = vision({
  projectId: 'grape-spaceship-123',
  keyFilename: '/path/to/keyfile.json'
});

visionClient.detectText('./image.jpg', function(err, text) {
  // text = [
  //   'This was text found in the image',
  //   'This was more text found in the image'
  // ]
});

With all that has been written about the inversion of control problems of callbacks and ES2015 support nearly complete and in wide use thanks to Babel, examples like this are feeling distinctly retro.

Also painful for anyone working with Docker is that the authentication appears to require me to include a keyfile.json somewhere in my container, where what I actually want is to store that stuff in the environment.

After a bit of experimentation, it turns out that that the google-cloud-node library doesn’t let us down. It’s filled with all the promisey goodness we scripters-of-java have come to expect. If you are using jest this test should get you going:

import Vision from '@google-cloud/vision'

describe('Google Vision client', () => {

  it('successfully connects', async () => {
    let client = Vision({
      projectId: process.env.GOOGLE_VISION_PROJECT_ID,
      credentials: {
	      private_key: process.env.GOOGLE_VISION_PRIVATE_KEY.replace(/\\n/g, '\n'),
        client_email: process.env.GOOGLE_VISION_CLIENT_EMAIL
      }
    })

    let [[text, ...words], annotations] = await client.detectText(__dirname + '/data/foo.jpg')
    expect(text).toEqual("foo bar\n")
    expect(words).toContain("foo", "bar")
  })

})

The project id is easy enough to find, but the environment variables used to avoid the keyfile.json are actually found within the keyfile.

{
  "type": "service_account",
  "project_id": "...",
  "private_key_id": "...",
  "private_key": "-----BEGIN PRIVATE KEY-----\n...\n-----END PRIVATE KEY-----\n",
  "client_email": "...@developer.gserviceaccount.com",
  "client_id": "...",
  "auth_uri": "https://accounts.google.com/o/oauth2/auth",
  "token_uri": "https://accounts.google.com/o/oauth2/token",
  "auth_provider_x509_cert_url": "https://www.googleapis.com/oauth2/v1/certs",
  "client_x509_cert_url": "https://www.googleapis.com/robot/v1/metadata/x509/..."
}

The keyfile above was created by going to the credentials console and following the instructions here.

Note the replace(/\\n/g, '\n') happening on the GOOGLE_VISION_PRIVATE_KEY. This is from issue 1173 and without it you end up with the error
Error: error:0906D06C:PEM routines:PEM_read_bio:no start line. Replacing new lines with new lines seems silly but you gotta do what you gotta do.

The last missing piece is an image with some text. I created a quick test image in Gimp with the words “foo bar”:

foo

While it wasn’t clear at first glance, google-cloud-node is a pretty sophisticated and capable library, despite being theoretically “alpha”. Google is remaking itself as “the AI company” and the boundary pushing stuff it’s doing means I’m probably going to be using this client a lot. I really was hoping to find a small amount of the “right” documentation instead of the huge volume of partial answers spread across their sprawling empire. Hopefully this is a useful contribution towards that reality.

Making requests in vanilla js with Apollo

There are lots of good reasons to be running GraphQL on the server. It’s clean, no ORM‘s or frameworks needed and has some interesting security properties too. But just because you are rockin’ the new hotness on the server side doesn’t mean you want it on the client side too. Sometimes the right thing is the simplest thing that can possibly work.

The Apollo Client is a GraphQL client made by the people behind Meteor. It aims to be an advanced and capable client that plays nice with the rest of the ecosystem. It has a lot going on, and sadly doesn’t seem to spend much time advertising that it’s actually a pretty great fit for those “simplest thing that can possibly work” moments as well.

Installing it is roughly what you might expect, but you also need the graphql-tag library so you can create queries Javascript’s new tagged template literals.

npm install --save apollo-client graphql-tag

So here, in all it’s glory, “simplest thing that can possibly work”:

import ApolloClient from 'apollo-client'
import gql from 'graphql-tag'

const client = new ApolloClient();

let query = gql`
  query {
    foo {
      bar
    }
  }
`
client.query({query}).then((results) => {
  //do something useful
})

I think this is actually even more simple than Lokka, which actually bills itself as the “Simple JavaScript Client for GraphQL”.

If you need to specify your endpoint as something other than the host the js came from, then you get to add just a little extra:

import ApolloClient, { createNetworkInterface } from 'apollo-client'

const opts = {uri: 'http://example.com:8080/graphql'}
const networkInterface = createNetworkInterface(opts)
const client = new ApolloClient({
  networkInterface,
});

But simple doesn’t mean we are restricted to queries only. Mutations can be simple too:

let mutation = gql`
  mutation ($foo: [FooInput] $bar: String!) {
    addFoo(
      foo: $foo
      bar: $bar
    ){
      foo
      bar
    }
  }
`

client.mutate({mutation, variables: {foo: [1,2,3], bar: "baz"}}).then((results) => {
  //do something with result
})

Obviously you will need the server side schema to support that, but that is all that is needed on the client.

Apollo has a tonne of features and integrates with Redux nicely (it does caching with it’s own internal Redux store unless you want it to use yours). While simplicity doesn’t appear to be it’s focus, the Apollo client is certainly capable of it. You’d just never guess from the documentation. Hopefully this will make it a little easier to appreciate the simple side of Apollo.

A look at the React Lifecycle

Every react component is required to provide a render function. It can return false or it can return elements but it needs to be there. If you providing a single function, it’s assumed to be a render function:

const Foo = ({thing}) => <p>Hello {thing}</p>
<Foo thing="world" />

There has been a fair bit written about the chain of lifecycle methods that React calls leading up to it’s invocation of the render function and afterwards. The basic order is this:

constructor
render
componentDidMount

But things are rarely that simple, and often this.setState is called in componentDidMount which gives a call chain that looks like this:

constructor
render
componentDidMount
shouldComponentUpdate
componentWillUpdate
render
componentDidUpdate

Nesting components inside each other adds another wrinkle to this, as does my use of ES6/7, which adds a few subtle changes to the existing lifecycle methods. To get this sorted out in my own head, I created two classes: an Owner and and Ownee.

class Owner extends React.Component {

  // ES7 Property Initializers replace getInitialState
  //state = {}

  // ES6 class constructor replaces componentWillMount
  constructor(props) {
    super(props)
    console.log("Owner constructor")
    this.state = {
      foo: "baz"
    }
  }

  componentWillReceiveProps(nextProps) {
    console.log("Owner componentWillReceiveProps")
  }

  shouldComponentUpdate(nextProps, nextState) {
    console.log("Owner shouldComponentUpdate")
    return true
  }

  componentWillUpdate(nextProps, nextState) {
    console.log("Owner componentWillUpdate")
  }

  shouldComponentUpdate(nextProps, nextState) {
    console.log("Owner shouldComponentUpdate")
    return true
  }

  render() {
    console.log("Owner render")
    return (
      <div className="owner">
        <Ownee foo={ this.state.foo } />
      </div>
    )
  }

  componentDidUpdate(nextProps, nextState) {
    console.log("Owner componentDidUpdate")
  }

  componentDidMount() {
    console.log("Owner componentDidMount")
  }

  componentWillUnmount() {
    console.log("Owner componentWillUnmount")
  }

}

A component is said to be the owner of another component when it sets it’s props. A component whose props are being set is an ownee, so here is our Ownee component:

class Ownee extends React.Component {

  // ES6 class constructor replaces componentWillMount
  constructor(props) {
    super(props)
    console.log("  Ownee constructor")
  }

  componentWillReceiveProps(nextProps) {
    console.log("  Ownee componentWillReceiveProps")
  }

  shouldComponentUpdate(nextProps, nextState) {
    console.log("  Ownee shouldComponentUpdate")
    return true
  }

  componentWillUpdate(nextProps, nextState) {
    console.log("  Ownee componentWillUpdate")
  }

  render() {
    console.log("  Ownee render")
    return (
        <p>Ownee says {this.props.foo}</p>
    )
  }

  componentDidUpdate(nextProps, nextState) {
    console.log("  Ownee componentDidUpdate")
  }

  componentDidMount() {
    console.log("  Ownee componentDidMount")
  }

  componentWillUnmount() {
    console.log("  Ownee componentWillUnmount")
  }

}

This gives us the following chain:

Owner constructor
Owner render
  Ownee constructor
  Ownee render
  Ownee componentDidMount
Owner componentDidMount

Adding this.setState({foo: "bar"}) into the Owner’s componentDidMount gives us a more complete view of the call chain:

Owner constructor
Owner render
  Ownee constructor
  Ownee render
  Ownee componentDidMount
Owner componentDidMount
Owner shouldComponentUpdate
Owner componentWillUpdate
Owner render
  Ownee componentWillReceiveProps
  Ownee shouldComponentUpdate
  Ownee componentWillUpdate
  Ownee render
  Ownee componentDidUpdate
Owner componentDidUpdate

Things definitely get more complicated when components start talking to each other and passing functions that setState but the basic model is reassuringly straight forward. The changes that ES6/7 bring to the React lifecycle are relatively minor but nonetheless nice to have clear in my head as well.
If you want to explore this further I’ve created a JSbin.

D3 and React 3 ways

D3 and React are two of the most popular libraries out there and a fair bit has been written about using them together.
The reason this has been worth writing about is the potential for conflict between them. With D3 adding and removing DOM elements to represent data and React tracking and diffing of DOM elements, either library could end up with elements being deleted out from under it or operations returning unexpected elements (their apparent approach when finding such an element is “kill it with fire“).

One way of avoiding this situation is simply telling a React component not to update it’s children via shouldComponentUpdate(){ return false }. While effective, having React manage all the DOM except for some designated area doesn’t feel like the cleanest solution. A little digging shows that there are some better options out there.

To explore these, I’ve taken D3 creator Mike Bostock’s letter frequency bar chart example and used it as the example for all three cases. I’ve updated it to ES6, D3 version 4 and implemented it as a React component.

letter_frequency
Mike Bostock’s letter frequency chart

Option 1: Use Canvas

One nice option is to use HTML5’s canvas element. Draw what you need and let React render the one element into the DOM. Mike Bostock has an example of the letter frequency chart done with canvas. His code can be transplanted into React without much fuss.

class CanvasChart extends React.Component {

  componentDidMount() {
    //All Mike's code
  }

  render() {
    return <canvas width={this.props.width} height={this.props.height} ref={(el) => { this.canvas = el }} />
  }
}

I’ve created a working demo of the code on Plunkr.
The canvas approach is something to consider if you are drawing or animating a large amount of data. Speed is also in it’s favour, but React probably narrows the speed gap a bit.

A single element is produced since the charts are drawn with Javascript no other elements need be created or destroyed, avoiding the conflict with React entirely.

Option 2: Use react-faux-dom

Oliver Caldwell’s react-faux-dom project creates a Javascript object that passes for a DOM element. D3 can do it’s DOM operations on that and when it’s done you just call toReact() to return React elements. Updating Mike Bostock’s original bar chart demo gives us this:

import React from 'react'
import ReactFauxDOM from 'react-faux-dom'
import d3 from 'd3'

class SVGChart extends React.Component {

  render() {
    let data = this.props.data

    let margin = {top: 20, right: 20, bottom: 30, left: 40},
      width = this.props.width - margin.left - margin.right,
      height = this.props.height - margin.top - margin.bottom;

    let x = d3.scaleBand()
      .rangeRound([0, width])

    let y = d3.scaleLinear()
      .range([height, 0])

    let xAxis = d3.axisBottom()
      .scale(x)

    let yAxis = d3.axisLeft()
      .scale(y)
      .ticks(10, "%");

    //Create the element
    const div = new ReactFauxDOM.Element('div')
    
    //Pass it to d3.select and proceed as normal
    let svg = d3.select(div).append("svg")
      .attr("width", width + margin.left + margin.right)
      .attr("height", height + margin.top + margin.bottom)
      .append("g")
      .attr("transform", `translate(${margin.left},${margin.top})`);

      x.domain(data.map((d) => d.letter));
      y.domain([0, d3.max(data, (d) => d.frequency)]);

    svg.append("g")
      .attr("class", "x axis")
      .attr("transform", `translate(0,${height})`)
      .call(xAxis);

    svg.append("g")
      .attr("class", "y axis")
      .call(yAxis)
      .append("text")
      .attr("transform", "rotate(-90)")
      .attr("y", 6)
      .attr("dy", ".71em")
      .style("text-anchor", "end")
      .text("Frequency");

    svg.selectAll(".bar")
      .data(data)
      .enter().append("rect")
      .attr("class", "bar")
      .attr("x", (d) => x(d.letter))
      .attr("width", 20)
      .attr("y", (d) => y(d.frequency))
      .attr("height", (d) => {return height - y(d.frequency)});

    //DOM manipulations done, convert to React
    return div.toReact()
  }

}

This approach has a number of advantages, and as Oliver points out, one of the big ones is being able to use this with Server Side Rendering. Another bonus is that existing D3 visualizations hardly need to be modified at all to get them working with React. If you look back at the original bar chart example, you can see that it’s basically the same code.

Option 3: D3 for math, React for DOM

The final option is a full embrace of React, both the idea of components and it’s dominion over the DOM. In this scenario D3 is used strictly for it’s math and formatting functions. Colin Megill put this nicely stating “D3’s core contribution is not its DOM model but the math it brings to the client”.

I’ve re-implemented the letter frequency chart following this approach. D3 is only used to do a few calculations and format numbers. No DOM operations at all. Creating the SVG elements is all done with React by iterating over the data and the arrays generated by D3.

Screenshot from 2016-06-02 09-24-34
My pure React re-implementation of Mike Bostock’s letter frequency bar chart. D3 for math, React for DOM. No cheating.

What I learned from doing this, is that D3 does a lot of work for you, especially when generating axes. You can see in the code there is a fair number of “magic values”, a little +5 here or a -4 there to get everything aligned right. Probably all that stuff can be cleaned up into props like “margin” or “padding”, but it’ll take a few more iterations (and possibly actual reuse of these components) to get that stuff all cleaned up. D3 has already got that stuff figured out.

This approach is a lot of work in the short term, but has some real benefits. First, I like this approach for it’s consistency with the React way of doing things. Second, long term, after good boundaries between components are established you can really see lots of possibilities for reuse. The modular nature of D3 version 4 probably also means this approach will lead to some reduced file sizes since you can be very selective about what functions you include.
If you can see yourself doing a lot of D3 and React in the future, the price paid for this purity would be worth it.

Where to go from here

It’s probably worth pointing out that D3 isn’t a charting library, it’s a generic data visualisation framework. So while the examples above might be useful for showing how to integrate D3 and React, they aren’t trying to suggest that this is a great use of D3 (though it’s not an unreasonable use either). If all you need is a bar chart there are libraries like Chart.js and react-chartjs aimed directly at that.

In my particular case I had and existing D3 visualization, and react-faux-dom was the option I used. It’s a perfect balance between purity and pragmatism and probably the right choice for most cases.

Hopefully this will save people some digging.

Graph migrations

One of the things that is not obvious at first glance is how “broad” ArangoDB is. By combining the flexibility of the document model with the joins of the graph model, ArangoDB has become a viable replacement for Postgres or MySQL, which is exactly how I have been using it; for the last two years it’s been my only database.

One of the things that falls out of that type of usage is a need to actually change the structure of your graph. In a graph, structure comes from the edges that connect your vertices. Since both the vertices and edges are just documents, that structure is actually just more data. Changing your graph structure essentially means refactoring your data.

There are definitely patterns that appear in that refactoring, and over the last little while I have been playing with putting the obvious ones into a library called graph_migrations. This is work in progress but there are some useful functions working already and could use some proper documentation.

eagerDelete

One of the first of these is what I have called eagerDelete. If you were wanting to delete Bob from graph below, Charlie and Dave would be orphaned.

Screenshot from 2016-04-06 10-55-54

Deleting Bob with eagerDelete means that Bob is deleted as well as any neighbors whose only neighbor is Bob.

gm = new GraphMigration("test") //use the database named "test"
gm.eagerDelete({name: "Bob"}, "knows_graph")

alice_eve

mergeVertices

Occasionally you will end up with duplicate vertices, which should be merged together. Below you can see we have an extra Charlie vertex.

extra_charlie

gm = new GraphMigration("test")
gm.mergeVertices({name: "CHARLIE"},{name: "Charlie"}, "knows_graph")

merged_charlie

attributeToVertex

One of the other common transformations is needing to make a vertex out of attribute. This process of “promoting” something to be a vertex is sometimes called reifying. Lets say Eve and Charlie are programmers.

knows_graph

Lets add an attribute called job to both Eve and Charlie identifying them as programmers:

adding_job_attr

But lets say that we decide that it makes more sense for job: "programmer" to be a vertex on it’s own (we want to reify it). We can use the attributeToVertex function for that, but because Arango allows us to split our edge collections and it’s good practice to do that, lets add a new edge collection to our “knows_graph” to store the edges that will be created when we reify this attribute.

adding_works_as

With that we can run attributeToVertex, telling it the attribute(s) to look for, the graph (knows_graph) to search and the collection to save the edges in (works_as).

gm = new GraphMigration("test")
gm.attributeToVertex({job: "programmer"}, "knows_graph", "works_as", {direction: "inbound"})

The result is this:

after_attrTo_vertex

vertexToAttribute

Another common transformation is exactly the reverse of what we just did; folding the job: "programmer" vertex into the vertices connected to it.

gm = new GraphMigration("test")
gm.vertexToAttribute({job: "programmer"}, "knows_graph", {direction: "inbound"})

That code puts us right back to where we started, with Eve and Charlie both having a job: "programmer" attribute.

knows_graph

redirectEdges

There are times when things are just not connected the way you want. Lets say in our knows_graph we want all the inbound edges pointing at Bob to point instead to Charlie.
knows_graph

We can use redirectEdges to do exactly that.

gm = new GraphMigration("test")
gm.redirectEdges({_id: "persons/bob"}, {_id: "persons/charlie"}, "knows_graph", {direction: "inbound"})

And now Eve and Alice know Charlie.

redirected_edges

Where to go from here.

As the name “graph migrations” suggests the thinking behind this was to create something similar to the Active Record Migrations library from Ruby on Rails but for graphs.

As more and more of this goes from idea to code and I get a chance to play with it, I’m less sure that a direct copy of Migrations makes sense. Graphs are actually pretty fine-grained data in the end and maybe something more interactive makes sense. It could be that this makes more sense as a Foxx app or perhaps part of Arangojs or ArangoDB’s admin interface. It feels a little to early to tell.

Beyond providing a little documentation the hope here is make this a little more visible to people who are thinking along the same lines and might be interested in contributing.

Back up your data, give it a try and tell me what you think.